
I have been talking about making this pork pie for months, and now finally, I did! My husband liked it very much! The only thing I did differently was how I served it, we preferred it on the warmer side, as opposed to cold or room temp. I didn’t have english mustard, so I used a blend of spicy brown and regular mustard to go with this. Very very tasty!!
I do hope you give this recipe a try. Its a bit long and looks daunting, but once you do it, its really not so bad. This made a big batch for me, and I ended up freezing the rest of the pies to use for quick meals later on. Oh, and especially, use your IFC pork!! I truly believe that made a difference!
Raised English Pork Pie

I tend to honor my asian roots and my southern roots in my cooking, and I have a strong cultural connection to England, but have never really paid much attention to it. Lately I have been paying alot of attention to it, obsessively much attention to it. I love BBC America, I love Doctor Who, so it was totally appropriate that it was on in the background as I was making this english pork pie recipe. I had been a little afraid to make these pies, the hot water lard crust was intimidating, and I think, shaping the pies. But as with anything, by the time you do the tenth one, its pretty easy!
This pie is constructed in three parts: the savory jelly, the filling and the crust. It helps to make the savory jelly a day or two in advance, as it needs alot of simmering time, then chill time. Don’t be afraid to work the dough, its quite forgiving, but be gentle when working with it, its not bread dough, its a short crust, but having your warm hands on it will keep the lard soft so that it is easy to work with, like play dough.
Yes, the anchovy essence or paste is somewhat important as it adds umami, that savoryness that rounds out the flavors. Only a tsp is used so you won’t taste fishiness, just do it, trust me. I’ve shown two methods of construction, the one using a form is traditional-ish. The one not using a form is easier. You can also make this into one big pie using a spring form pan, or many little ones using a jumbo muffin pan. But, I wanted the experience of making these by hand because I like a challenge.
If your crust develops a hole or tear, just take a piece of dough, wet it and paste it over the hole like a patch. Look over your pie carefully before baking for any holes, you don’t want the jelly to leak out. The purpose of the jelly is to fill the gaps after cooking, between the crust and filling, and it adds an authenticness to the dish, as does the anchovy essence, don’t frown, just do it, trust me. Traditionally, pork trotters were used for the jelly, but I used pork soup bones, and cooked them down.
Read through the directions thoroughly, and write down an outline of your plan of attack, trust me, you won’t forget anything that way. Using my recipe takes alot of trust doesn’t it?
Jelly Ingredients:
Pork soup bones
garlic clove
1 tsp salt
bay leaf
bouquet garni (I used a 1/2 tsp of italian seasoning)
6 cups water or more to cover the soup bones
Filling Ingredients:
1 lb boneless pork country ribs
1 lb pork shoulder roast
1 tsp sage
pinch of cinnamon
pinch of nutmeg
pinch of alspice
pinch of pepper
1/2 tsp anchovy essence or paste (just do it!)
1 tsp salt
Crust Ingredients:
4 cups flour
1 cup whole milk
1 cup lard
1/2 tsp salt
1 tbsp powdered sugar
A beaten egg for brushing onto the pastry pies
Preheat your oven to 400 degrees.
 |
| boneless ribs, IFC of course! |
The Process:
The day before, or even two days before, simmer the all the jelly ingredients for at least 2 hours. Strain the stock through a fine sieve, return to the pan and boil rapidly until reduced to about 3 cups or less. The stock should be slightly silky and thicker than just plain liquid. Chill in the fridge, and when solid, skim the fat off the top. Leave covered in the fridge until after the pies are cooked and cooled.
Process the boneless ribs to rough chunks with a food processor, dump into large mixing bowl. Process the pork shoulder a bit finer, but NOT to mush, just a little finer than the ribs. Mix both meats with the rest of the ingredients. Keep in the fridge until you are ready to use.
Slowly bring the milk and lard to a boil. While waiting, put the flour, sugar and salt in a large mixing bowl, make a well in middle, and add the boiling milk and lard. Mix until the pastry is smooth. Dump out onto work surface and begin making your pie cases before the pastry cools.
 |
| Bottom of pie over jar, and using the jar as a cutter for the top |
Method One – using a form
Knead your pastry until its smooth like play dough, then divide it into fourths, take one fourth away and cut that piece into four pieces, these will be the tops. Mush the leftover three fourths together and again divide into four pieces. Take one piece to work with, cover the rest with a towel until you are ready. Have a little bowl of water nearby.
Roll out the piece into a circle, drape it over the bottom of a floured16oz peanut butter jar, or something about that size or even a bit larger, slowly and gently mold the sides. While the bottom is draped over the jar, roll out one of your small bits of pastry and use the jar as a cutter for the top. Just apply gentle pressure and rotate back and forth. Turn the jar upright and gently prise off the pastry cup, it will stick and be stubborn, but the pastry is forgiving and any tears and holes can be patched.
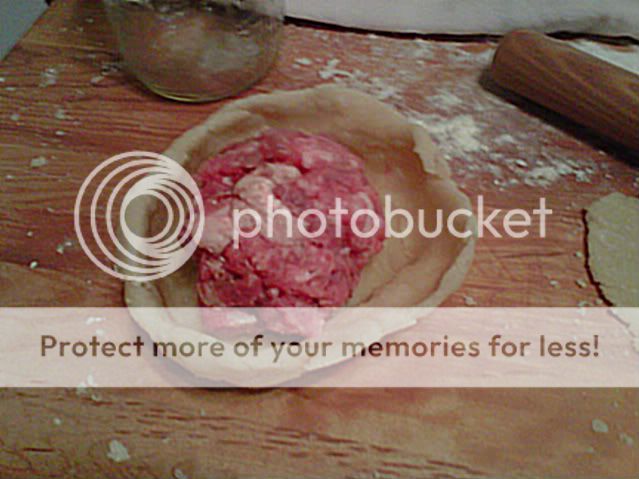
Place a small handful of the filling into the case, then moistening the sides, and the top piece of pastry, put the lid on it, and start pressing the two firmly together. The lid will attach from the inside, creating structure for the cup so that it will keep its shape.
Method Two – without using a form (my preferred method)

Roll pastry out into a large circle, place a small handful of filling in center, then begin pulling up the sides of the pastry around the filling like cinching the top of a sack.

Pull or cut off the excess dough around the top, and start pinching the sides at the top to form the cup like shape.

Moisten the inside top of the pastry cup and the top piece and place the top just inside the pastry cup and begin pressing together, try not have too much excess pastry, pinch off any thick parts, the finished product will be better for it.

After firmly attaching the top and pressing together, begin crimping the edge, just like you would a pie crust, I think it looks cute that way. If you look at the pictures on the internet, you can tell the man-made pies, and the lady-made pies, ours are WAY prettier 🙂

Place all your pies on a parchment lined cookie sheet, and brush the tops with a beaten egg.
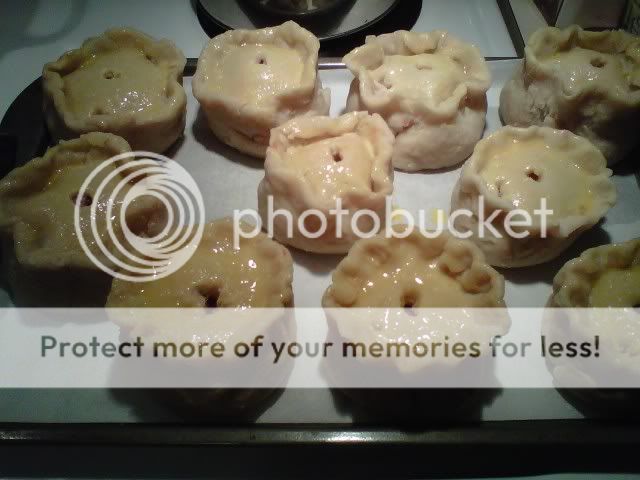
The large crimped pies are the form raised, and the smaller crimped pies are the ones I made without the form. I liked not using a form, I felt as though I had more control over the dough. Also, its one less thing to wrestle around.
Bake at a preheated 400 degrees for 20 minutes, then reduce the temperature to 350 and bake 55 minutes more.

Remove from oven and allow to cool. After they have cooled to at least room temp. Gently reheat your jelly, not until its hot, but just until its liquid.

I used a cupcake filling tip as my funnel, and added spoon by spoon of my liquid jelly into each pie. I just kept going around the tray to each one and added a spoonful of jelly until each pie could not hold anymore jelly. If you have a pie that sprung a leak, just add jelly until you see it seeping out.
Refrigerate, then eat!! Traditionally these were served cool or room temp with a side of english mustard. Ankeny, Iowa doesn’t have english mustard! So I decided maybe a spicy brown mustard would suffice.
Would I make this recipe again! Emphatically yes. These will freeze beautifully and I believe my husband will love them as a quick lunch. After going through the process, its not nearly as daunting as it seemed, just like most things in life. I had plenty of jelly left, and I froze it, to use when I make these again.
