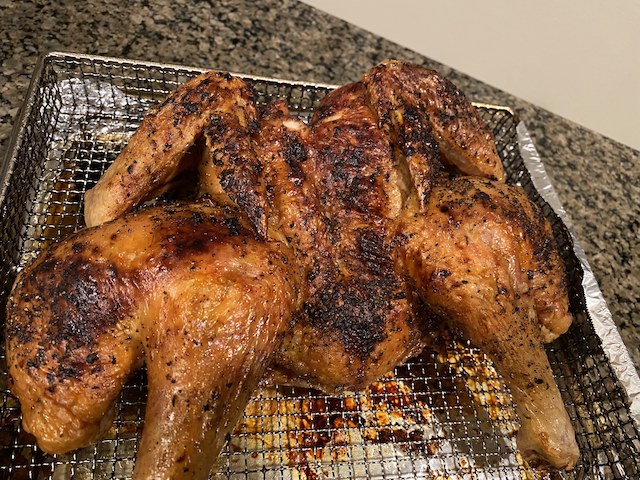
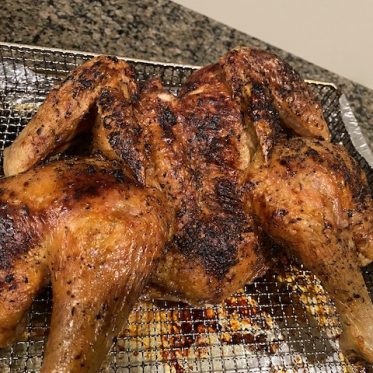
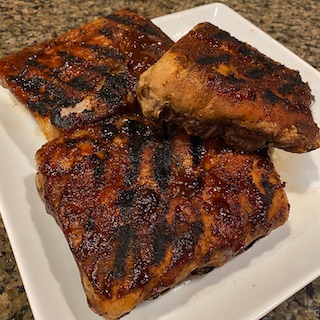
Category: Recipes

Fail-Proof BBQ Ribs

Fail-Proof BBQ Ribs

Raise your hand if you’ve ever had high hopes for BBQ ribs, only to have your spirit dashed by an overcooked, dried out, swimming in sauce disappointing piece of meat. If you’ve ever experienced this sadness, you are definitely not alone. Enter the easiest solution to this problem that’s likely already in your pantry – plastic wrap! I know, I know, you instantly envisioned an evening of trying to get melted plastic off of your baking sheet; not to mention thinking The Recipe Lady has completely lost her mind. I promise neither will happen – plastic wrap melts at 250F and we’re cooking at 225F for low & slow. This recipe won’t disappoint even the pickiest rib fan and you can have BBQ ribs no matter if you don’t have access to a grill, live in an apartment, or the weather is less than cooperative.

Ingredients
  

  • 1 rack pork spare ribs available at IFC
  • 3 TB Rub already mixed, or DIY – ingredients listed below for DIY// available at IFC

DIY BBQ Rub:

  • 2 TB dark brown sugar
  • 2 TB smoked paprika
  • 1 TB salt
  • 1 1/2 tsp ground black pepper
  • 1 tsp granulated garlic aka garlic powder available at IFC
  • 1 tsp onion powder
  • 1/2 tsp cumin
  • 1/2 tsp ground coriander
  • 1/2 tsp cayenne pepper
  • Mix spices & sugar well. Leftover rub can be stored in an airtight container for about 6 months or a few years in the freezer.

Instructions
 

  • Preheat oven to 225 degrees.
  • Pat the ribs dry with paper towels & cut the ribs into halves or thirds (this is for no other reason than they’re easier to handle).
  • Rub about 3 TB of spice mix onto the meat side of the ribs.
  • Wrap in plastic wrap, alternating left-to-right, top-to-bottom for a total of six layers of wrap. Taking care to make the bundle snug.
  • Place on a rimmed baking sheet, bone side down, and bake for 2 1/2 hours.
  • Carefully remove the plastic wrap, being careful not to burn yourself with the juices. (I’ve found that holding the packet with tongs over the sink, and using kitchen shears to remove the plastic is be my best method for not getting burned.)
  • Brush the tops of the rib racks with BBQ sauce (a little or a lot depending on how you saucy you like your ribs + available at IFC). Either return to the baking sheet, sauce side up & place under a broiler for 5 to 6 minutes to caramelize the sauce. Or, finish them, sauce side down, on a high heat grill.
  • Cut the racks into one or two bone pieces and enjoy!

Notes

Make ahead tip: Cook the ribs up to step 5, then refrigerate the wrapped ribs. On the day you want to eat them, remove from the fridge and let sit at room temperature for about 1 1/2 to 2 hours. Then proceed with step 6. This also works well if you’re only cooking for 1 or 2 and can’t finish a whole rack in one sitting. You can freeze some for another day – just let them thaw in the fridge overnight, then bring to room temperature before finishing them with sauce!

Nacho Average Chips + Salsa

Nacho Average Chips + Salsa

I’ve noticed lately I want more fun foods in my days. Maybe it’s from staying at home, or perhaps it’s due to the nice days that bring the promise of warm summer days and the potential for backyard BBQs with friends. No matter the reason, these nachos definitely fall into the category of ‘fun food,’ while also providing a change from the usual ground beef or chicken with salsa version. They’re hearty enough to have for lunch, or even dinner; and by using precooked pulled pork, this also becomes a quick and easy meal.

Ingredients
  

  • Tortilla chips
  • 1 – 1 1/2 cups shredded cheddar cheese add more or less depending on your preference
  • 3/4 – 1 lb. cooked BBQ pork plain or pre-sauced
  • 1 – 2 slices of cooked bacon crumbled (optional)
  • BBQ sauce for drizzling
  • Sour cream or Greek yogurt for topping
  • Your favorite toppings such as diced tomatoes sliced jalapeños, diced avocado

Instructions
 

  • Warm the pork in a small sauce pan over medium- low, being careful not to let it dry out.
  • Preheat the oven to 350 F.
  • Using a rimmed baking sheet, spread the chips on the pan. (Tip: If you use aluminum foil on the pan, you won’t need to scrape cheese off of it later.)
  • Top the chips with shredded cheese and bake in the oven until the cheese is melted, about 5 to 10 minutes.
  • Place shredded pork over the melted cheese, sprinkle the crumbled bacon across the top, drizzle with BBQ sauce, top with sour cream (or Greek yogurt) and your favorite toppings.

Notes

Serve warm & enjoy!

Budget Stretcher Recipe: Cheeseburger Macaroni

Budget Stretcher Recipe: Cheeseburger Macaroni

The world seems almost surreal these days. With so many trying to stretch their budgets as much as possible, eating at home more, and trying to entertain their kids, I decided this was a good time to share one my favorite creations – cheeseburger macaroni. This is always a dinnertime pleaser and can be modified so many different ways by simply changing up the cheese. This recipe is also incredibly wallet friendly at about $2.65 per serving. So skip the chemical laden box with the smiling glove, grab some basic ingredients, and prepare to be wowed because this comforting dish is anything but basic.

Ingredients
  

  • 1 lb ground beef, capon, or turkey
  • 1 TB cornstarch
  • 2 tsp paprika
  • 1 tsp onion powder
  • 1 tsp garlic powder
  • 1 tsp salt
  • 1/2 tsp honey or 1 tsp sugar okay to omit if you’re focusing on a lower sugar diet
  • 1/4 tsp ground black pepper
  • 1 cup hot water
  • 2 cups milk
  • 1 1/2 cups uncooked pasta elbow, bowtie, spirals, penne, or egg noodles all work just fine – no need to buy anything special, use whatever is in your pantry
  • 1 1/2 cups shredded cheese or cheese curds

Instructions
 

  • Brown ground meat in a large skillet over medium-high heat, then drain any fat, and return to skillet.
  • Add cornstarch, paprika, onion powder, garlic powder, salt, honey/sugar, black pepper to the meat. Stir in hot water, followed by the milk and pasta. Stir to combine and bring to a boil.
  • Reduce heat to low, place lid on skillet, then simmer until pasta is al dente (7 – 10 minutes depending on your noodle shape). Stir a few times while pasta is cooking.
  • Remove skillet from heat and stir in the shredded cheese until melted. Let stand for about 5 minutes to thicken the sauce.

Notes

Switch it up with your favorite cheese curds instead of shredded cheese, or add some chopped bacon for a bacon cheeseburger.
Serve with a salad or your favorite vegetables to make a balanced meal.
Store leftovers tightly covered in the refrigerator for up to 5 days

Coney Island Hot Dogs

Coney Island Hot Dogs

You know what, it’s time for ‘morale food.’ You know, that food that lifts your spirits when times are rough? Well, I may not be able to transport you to Brooklyn or to the boardwalk for a Nathan’s Coney Dog, but I can certainly tell you how to make them in the comfort of your own home. These hot dogs are a perfect balance of sweet & savory and a sure-fire way to lift the spirits of everyone in your house.

Ingredients
  

  • 1 lb ground beef
  • 1/4 cup chopped onion
  • 3/4 cup ketchup
  • 2 TB sugar
  • 2 TB vinegar
  • 2 TB yellow mustard
  • 1/4 tsp celery seed
  • 1/4 tsp Worcestershire sauce
  • 1/4 tsp ground black pepper
  • 1/4 tsp salt

Instructions
 

  • In a medium sauce pan over medium heat, brown ground beef and onion until beef is cooked through and crumbly. Drain any grease from the pan.
  • Stir in the ketchup, sugar, vinegar, yellow mustard, celery seed, Worcestershire sauce, black pepper, and salt.
  • Reduce heat to low and simmer for 30 minutes, stirring occasionally.

Notes

Serve hot dogs + buns topped with shredded cheddar cheese, extra onions, mustard – really, whatever you like. Add in a cookie for dessert because you’ve earned it.
Leftovers will keep for up to 5 days in the refrigerator or up to 6 months in the freezer.

The Bird is The Word–Rotisserie Style Chicken at Home

The Bird is The Word–Rotisserie Style Chicken at Home

How many times has someone promised you a juicy baked chicken recipe only to leave you with a dry bird that’s reminiscent of the turkey scene from ‘National Lampoon’s Christmas Vacation?’ I super, duper promise this recipe will not leave you needing a vat of gravy to add moisture to your meal. How you ask? Because we’re going to spatchcock that bird! By spatchcocking you lessen the roasting time needed to cook your chicken, which means the breast doesn’t dry out while waiting for the thighs to cook through. Not only is it an easy technique, but this simple recipe delivers so much flavor that you’ll be wanting to put it into your regular menu rotation.

Ingredients
  

  • 1 3.5 to 5 lb whole chicken
  • 1/2 tsp dried oregano
  • 1/2 tsp dried basil
  • 1 1/2 TB BRAISED Bone Broth Chaga-Thyme Seasoning
  • 1 tsp ground black pepper
  • 1 TB coarse ground salt such as kosher salt
  • 2 TB olive oil

Instructions
 

  • Preheat oven to 425 degrees, or air fryer to 375 degrees.
  • In a small bowl, combine all seasonings with the olive oil to form a paste. Set aside.
  • Using sharp kitchen shears, spatchcock the chicken by cutting down both sides of the backbone and removing it. Discard the backbone. Flip the chicken over and press down firmly between the two breasts, flattening the chicken. (See video demonstration below)
  • Rub the skin side of the chicken with the seasoning paste. Place chicken in the pan or air fryer basket, skin side down.
  • Roast or air fry for 20 minutes, and then flip it over, cooking for an additional 20 to 25 minutes, or until an instant read thermometer inserted into the thickest part of the breast and thigh registers 165 F. Allow to rest for 10 minutes before serving.

Video

Notes

If you make your own chicken stock, don’t throw the back away. Instead, toss it in a bag and into the freezer for use in your next batch of stock or broth.

One-Pan Wonder – Chicken & Crispy Gnocchi with Spinach (w/Vegan Option)

One-Pan Wonder – Chicken & Crispy Gnocchi with Spinach (w/Vegan Option)

We all need a one-pan wonder from time to time and this one certainly fits the bill. Whether it’s for a special occasion or the middle of the week, this dish is sure to please both the palate and the eye. Note: If you want to make this dish vegetarian or Vegan, you can absolutely skip the bacon, chicken, and cheese by simply swapping in and extra pound of sliced mushrooms. If you do a mushroom medley, it adds a nice complexity to the flavors.

Ingredients
  

  • 4 slices of bacon
  • 5 oz. sliced mushrooms shiitake, portobella, white button – any mushrooms are fine
  • 1 lb. chicken breast or chicken thighs – bone-in or boneless (if bone-in, cut off bones) cut into chunks
  • 1/4 tsp seasoned salt
  • ground black pepper to taste
  • 1-2 TB Greek oregano & garlic infused olive oil
  • 12 oz package gnocchi if you need gluten-free, be sure to read the package since not all gnocchi is created equal
  • 3 to 4 cups fresh spinach
  • 1/4 to 1/3 cup pesto from a jar or homemade – your choice
  • grated Reggiano for topping

Instructions
 

  • Add bacon to a cold large skillet and cook over medium heat until crispy. Remove to a clean plate, reserving bacon fat in the skillet. Once cooled, crumble or chop the bacon.
  • Turn up the heat medium-high, season chicken with seasoned salt & pepper. Add seasoned chicken and mushrooms to the skillet and cook until chicken is no longer pink in the center. Scoop chicken and mushrooms onto the plate with the bacon.
  • Add enough olive oil to the skillet to equal about 2 TB of fat. Reduce heat to medium and add gnocchi, arranging in a single layer. Saute until bottoms are golden brown and crispy – about 2 to 3 minutes. Stir, and continue to saute another 2 or 3 minutes until gnocchi are tender and golden brown all over.
  • Turn heat down to low, all fresh spinach, chicken, mushrooms, and crumbled bacon to the pan. Cover with a lid and allow spinach to mostly wilt – about 3 minutes. Stir in chicken, bacon, mushrooms, and 1/4 cup pesto, taste and add additional pesto or black pepper if needed. Allow to cook for another minute before removing from heat and plating. Serve immediately with a sprinkle of grated Reggiano.

Scallion Waffles

Scallion Waffles

A little bit sweet and a whole lot of savory, who doesn't love veggie-filled waffles for dinner?! Thank you to our members Daniel Burnette and his wife, Karen Fullenwider, for this delicious recipe.

Ingredients
  

  • FOR THE WAFFLES:
  • ½ cup all-purpose flour
  • ½ cup cornstarch
  • ¾ teaspoon fine sea salt plus more as needed
  • ½ teaspoon baking powder
  • ¾ cup ice water
  • 1 large egg
  • ¼ cup finely chopped kimchi
  • 4 cups finely grated emphasis on finely grated mixed vegetables (carrots, zucchini, bell peppers, kale, whatever you’ve got)
  • 4 scallions cut into 2-inch-long sections and thinly sliced lengthwise
  • 2 tablespoons cooking oil plus more as needed
  • FOR THE DIPPING SAUCE:
  • 3 tablespoons soy sauce
  • 2 teaspoons rice wine vinegar plus more to taste
  • 1 teaspoon finely grated fresh ginger or garlic optional
  • ½ teaspoon sesame oil plus more to taste
  • pinch of granulated sugar

Instructions
 

  • Prepare the pancakes: In a large bowl, whisk together all-purpose flour, cornstarch, salt and baking powder.
  • In a medium bowl, combine water, egg and kimchi. Whisk kimchi mixture into flour mixture, and whisk until smooth. Fold in vegetables and about three-quarters of the scallions. (Save the rest for garnish.)
  • In a large nonstick waffle iron over medium heat, heat 1 teaspoon oil. Scoop portions of batter into the waffle iron and cook on medium heat.Transfer to a paper towel-lined plate and sprinkle with a little more salt. Continue with remaining batter.
  • Before serving, make the dipping sauce: In a small bowl, stir together soy sauce, vinegar, ginger or garlic (if using), sesame oil and sugar. Sprinkle sliced scallion over pancakes, and serve with dipping sauce on the side.

Budget-Stretcher Beef & Noodles

Beef & Noodles
Beef & Noodles

Budget-Stretcher Beef & Noodles

Because eating local doesn't need to mean breaking your budget, I present this super easy beef & noodles recipe using local ingredients. Not only is this budget friendly, but it's flavorful and perfect for these chilly winter days!
Servings 8

Ingredients
  

IFC Ingredients:

  • Ground beef: http://bit.ly/GroundBeefIFC
  • Carrots: http://bit.ly/CarrotsIFC
  • Onions: http://bit.ly/OnionsIFC
  • Egg noodles: http://bit.ly/BearCreekIFC
  • Rosemary: http://bit.ly/DriedHerbsIFC

Ingredients:

  • 1 lb ground beef
  • 1/4 cup chopped onion
  • 1 cup of chopped carrots
  • 1 cup frozen peas
  • 6 cups beef broth
  • 1 tsp dried thyme
  • 1 tsp dried rosemary
  • 1/2 tsp garlic powder
  • 1/3 cup + 3 TB cornstarch
  • 1/2 cup water
  • 12 oz dry egg noodles

Instructions
 

  • In a medium size sauce pan over medium heat, bring beef broth to a low boil. In a small bowl, combine cornstarch with 1/2 cup water. Slowly whisk in the cornstarch slurry followed by the thyme, rosemary, garlic powder, salt, and pepper. Reduce heat to low and simmer until the gravy thickens to your desired consistency. Turn off the heat and let the gravy stay warm on the burner.
  • Bring a large pot of water to a boil, and egg noodles and cook until the noodles are cooked through – this will take about 10 – 13 minutes. Begin testing the noodles at the 10 minute mark. Drain and return to the pot. Stir in the gravy followed by the frozen peas. (Note: there is no need to warm the peas, the heat from the noodles will perfectly cook them from frozen.)
  • Steam carrots – there are many ways you can do this, I typically opt for the easy way out and put them in a bowl with plastic wrap and microwave for 2 minutes. Stir into the noodles.
  • Meanwhile, cook the ground beef and onions in a skillet, breaking up the beef, until cooked through. Drain off any grease, and stir into the noodles. Taste and adjust salt and pepper as needed.

Notes

Leftovers can be stored in the refrigerator for up to 4 days, or frozen in an air tight container for up to 3 months.

Cincinnati Chili

Cincinnati Chili

Let's talk chili, Cincinnati chili, in particular. When I explain this particular chili to folks, I start by saying it's not the reddish, tomato-based Tex-Mex chili they're used to eating; it's best to think of Cincinnati chili as a mole of sorts since it contains both chocolate and cinnamon. Yes, I know that seems like an odd thing to put on spaghetti or hot dogs, but trust your Recipe Lady on this one, it just works and it works well.


How did this strange dish come to be?


The history of Cincinnati Chili – a heart felt story of two Macedonian refugees who fled to America from Argos Orestiko in order to escape the Balkan Wars in 1921: Macedonian immigrant Tom Kiradjieff created Cincinnati chili in 1922. With his brother, John, Kiradjieff opened a small Greek restaurant called the Empress. The restaurant did poorly however, until Kiradjieff started offering a chili made with Middle Eastern spices, which could be served in a variety of ways. He called it his “spaghetti chili.” Kiradjieff’s “five way” was a concoction of a mound of spaghetti topped with chili, chopped onion, kidney beans, and shredded yellow cheese, served with oyster crackers and a side order of hot dogs topped with more shredded cheese.


The 'ways' of the chili:


Two-way: spaghetti topped with chili

Three-way: spaghetti topped with chili and shredded cheddar

Four-way: spaghetti topped with chili, cheese, and chopped onion

Five-way: spaghetti topped with chili, cheese, chopped onion, and beans


For a Cincinnati coney, substitute a hot dog in a bun for the spaghetti


*******************

IFC Ingredients:


Ground beef

Cheddar cheese

Onions

Crushed red pepper

Hot dog buns

Hot dogs

Ingredients
  

  • 1 lb ground beef
  • 1/2 TB vegetable oil
  • 1/4 cup chopped onion
  • 2 TB chili powder
  • 1/2 tsp ground cinnamon
  • 1/2 tsp ground cumin
  • 1/8 tsp ground allspice
  • 1/8 tsp ground cloves
  • 1 bay leaf
  • 1/4 ounce unsweetened chocolate about 1/2 of a square of baker’s chocolate or 3/4 tsp of cocoa powder
  • 1 1/4 cups beef broth
  • 8 oz tomato sauce
  • 1 TB apple cider vinegar
  • 1/4 tsp crushed red pepper flakes or 1/8 tsp ground cayenne pepper

Toppings:

  • Shredded cheddar cheese
  • Diced onion
  • Cooked kidney beans

For serving: cooked spaghetti or hot dogs

    Instructions
     

    • In a large saucepan over medium heat, add oil and onions. Cook, stirring frequently, until tender, about 6 minutes.
    • Add beef, breaking up with a wooden spoon. Stirring frequently, cook until browned.
    • Add chili powder, cinnamon, cumin, allspice, cloves, chocolate, beef broth, tomato sauce, cider vinegar, and red pepper. Stir to mix well. Bring to a boil. Add the bay leaf and reduce heat to low. Cover and simmer for 1 1/2 hours, stirring occasionally.
    • Remove bay leaf and serve over cooked spaghetti with the toppings of your choice, or on hot dogs.

    Notes

    Leftovers can be stored in an airtight container in the refrigerator for 4 days; or, frozen in an airtight container for up to 9 months.